The Chikushino Course (筑紫野コース / Chikushino Kōsu) is Century's front nine (out). Starting along the mountainside, it follows a path where maples, mountain cherries, and azaleas change expression with the seasons, while two par 3s and two par 5s set the rhythm. In this chapter, we follow all the holes alongside the official hole maps, one by one, laying out the attack points so that golfers visiting from Thailand won't lose their way even on a first round.
The Chikushino Course at a glance
Chikushino is a relatively flat yet generously long course. The green is easy to see from the tee, making strategy straightforward, but the long distances mean that an accurate second shot and approach decide your score. The greens are large with subtle live undulation, so even after reaching them, a lapse in focus can lead to a three-putt.
Many of Century's holes have two greens (Bent 1 and Bent 2), and depending on which green is in use that day, the distance and the line of attack change completely. On some holes, even the par and distance change with the green. Check on the teeing ground's signboard and the cart navigation which green is in use today first. The distances below follow the official hole-by-hole notation, and for holes with two greens, both values are listed together.
Beyond the regular nine holes, Chikushino has one extra practice hole, so physically there are 10 holes (the club operates them to suit the day's conditions). In this chapter we first introduce No.1–No.9 in regular-round order, then add the practice hole (華道) at the end. As the handicap (hole-difficulty ranking) is not separately noted on the official hole maps, we won't assert it, instead giving guidance based on distance and strategy.
No.1 · 希望 (Kibō / "Hope") · PAR 4
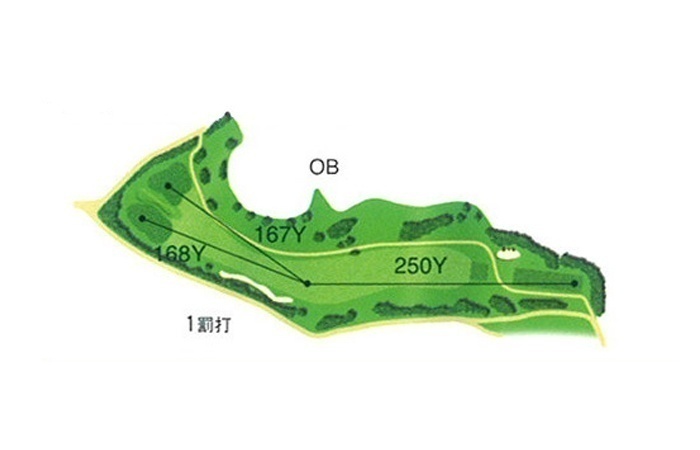
Chikushino's opening hole. A par 4 that curves gently to the right (dogleg right). Sending your tee shot right leaves a blind where you can't see the green on your second shot, so keeping the left fairway is your first task. In spring, weeping cherries and Hirado azaleas bloom on the mountainside to the right, giving you Century-worthy scenery from the very first hole.
Don't get greedy — aim straight at the left side of the fairway. Avoid the OB and mountainside on the right and the green opens up for your second shot.
No.2 · 秋月の里 (Akizuki no Sato / "Akizuki Village") · PAR 4
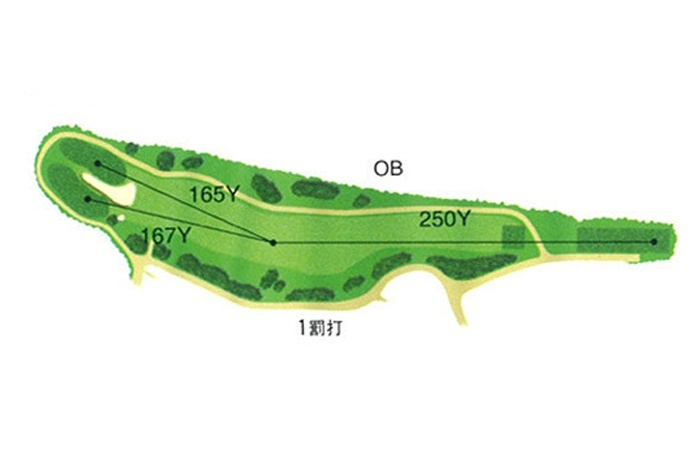
A straight, flat middle hole (par 4). Standing on the teeing ground, the fairway looks unusually narrow, but it widens the farther in you go. Don't shrink from the visible width — swing with confidence. With a persimmon-covered hill (柿山) on the right and maples coloring vividly within the deep greenery behind the green, it's a hole full of autumn atmosphere.
Don't be fooled by the narrow entrance you see from the tee. Even taking a full swing down the middle at your usual driver distance, the wide fairway inside will accept it.
No.3 · 耳納 (Minō) · PAR 3
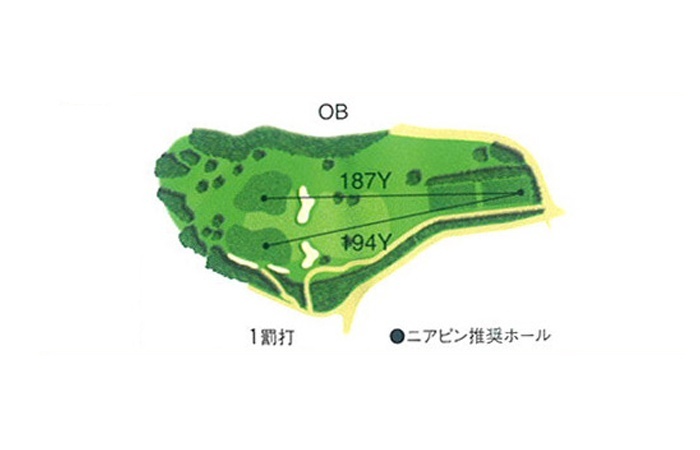
Chikushino's first par 3 (short hole). A large bunker yawns in front of each green, and a yamamomo (山桃, bayberry) tree stands between the tee and the green, putting visual pressure on you. The distance is relatively short, so this is a hole where you want to secure par without getting greedy and move on.
Check the distance to the green in use today first and take a generous extra club. Focus on carrying the front bunker and you can safely find the green.
No.4 · 阿蘇 (Aso) · PAR 4
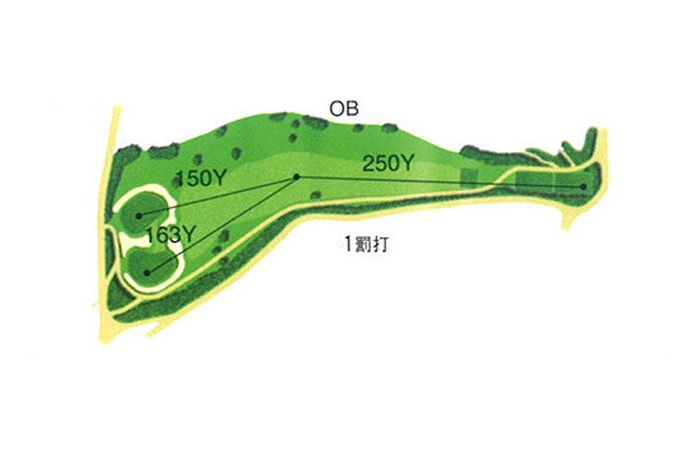
A middle hole curving slightly left (dogleg left). It's best to keep the right fairway with your tee shot. Both greens are ringed by guard bunkers, so it's a hole you'll want to attack with a high ball that stops well on your second shot. Mountain cherries line the mountainside, waiting for spring.
Play your tee shot to the right fairway. To avoid the greenside bunkers, it's safer to aim for the center of the green with a high shot rather than going directly at the pin.
No.5 · 慈悲峠 (Jihi Tōge / "Mercy Pass") · PAR 4
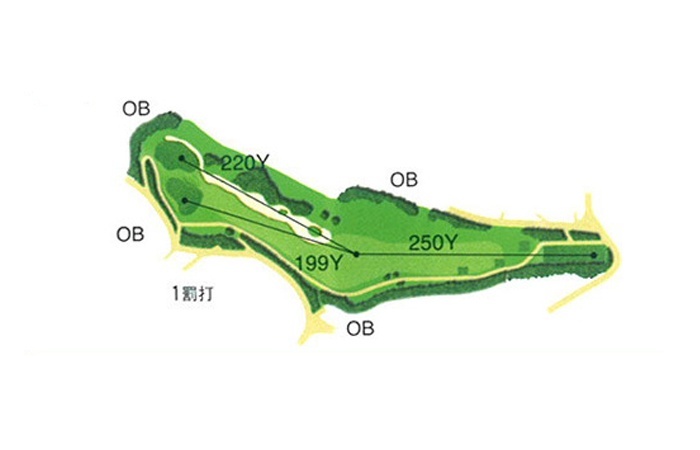
A hole counted as the longest middle hole (par 4) at Chikushino. It doglegs slightly right, and from the 250-yard point to the green, a large bunker about 180 m long runs along the right. The scenery, blending with the karesansui (枯山水, dry landscape) garden laid out above it, is spectacular. On the mountain to the right, 600 Somei-Yoshino cherry trees adorn spring, while to the left the Chikugo Plain and the Mino mountain range spread out at a glance.
It's a long hole, so it's easy to get greedy for distance, but drift right and you're trapped in the long bunker. Rather than forcing an attack at the pin, send your second shot safely to just short of the green and consider a three-on bogey a good result.
No.6 · 紅葉谷 (Kōyō Dani / "Autumn-Leaf Valley") · PAR 4
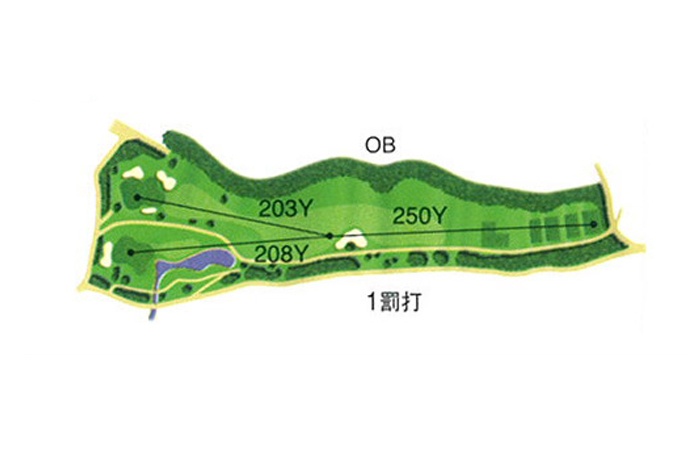
A gentle downhill, but a long, tough middle hole (par 4). The height difference between the left and right greens reaches 5 m, so the attack changes completely depending on the green in use. In particular, a large pond yawns in front of the left green, narrowing the route. With 200 maples planted on this hole alone, they color beautifully against the deep greenery.
It's a long par 4, so it's easy to leave a long second shot. On days using the left green, be mindful of the pond out front and, rather than forcing a direct attack at the pin, secure the center or front of the green with a safe club.
No.7 · 皐月ヶ原 (Satsukigahara) · PAR 5
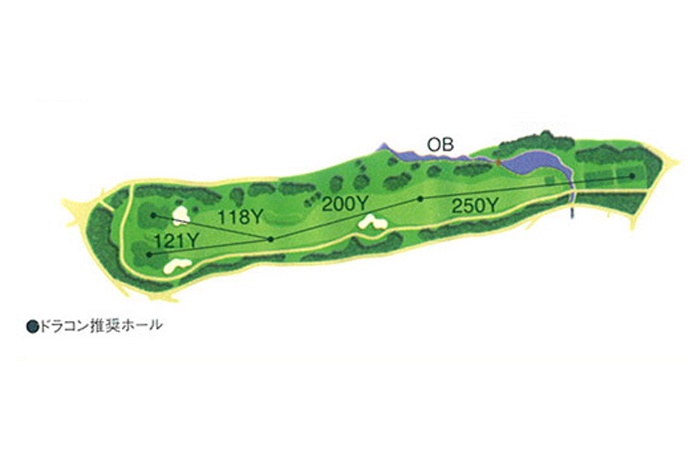
Chikushino's first par 5 (long hole). Though the hole runs straight, creeks, ponds, and bunkers are intricately placed throughout, and the fairway has just the right undulation, making it rich in variation. In spring the azaleas around the tee, and in summer the rose of Sharon behind the green, are a pleasure for the eye. Marked on the official hole map as a recommended drive-contest (drakon) hole, it's worth letting one rip.
As a long par 5, a three-on strategy is sensible. Look at the fairway undulation and the position of the creeks and bunkers to set your layup point for the second shot, leaving your third shot at a distance you like.
No.8 · 山桜 (Sanrō / Yamazakura · "Mountain Cherry") · PAR 4 or 3
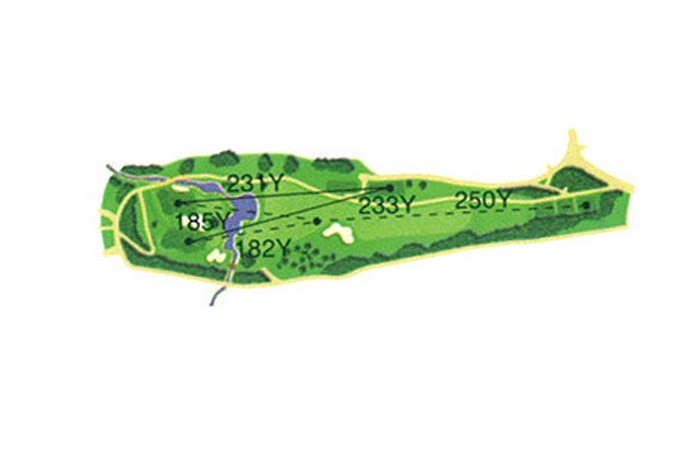
A hole with two faces — a middle hole and a short hole. Depending on the green in use, it becomes a par 4 (middle) or a par 3 (short). The two greens are divided by a large mountain cherry and deep bunkers, and a large creek crossing the fairway in front of the green from right to left raises the strategic challenge.
This hole's distance and par change greatly depending on how it's set up. Be sure to check the day's green and tee position on the teeing ground, and choose a club that will carry the creek crossing in front of the green.
No.9 · 別離 (Betsuri / FAREWELL · "Parting") · PAR 3
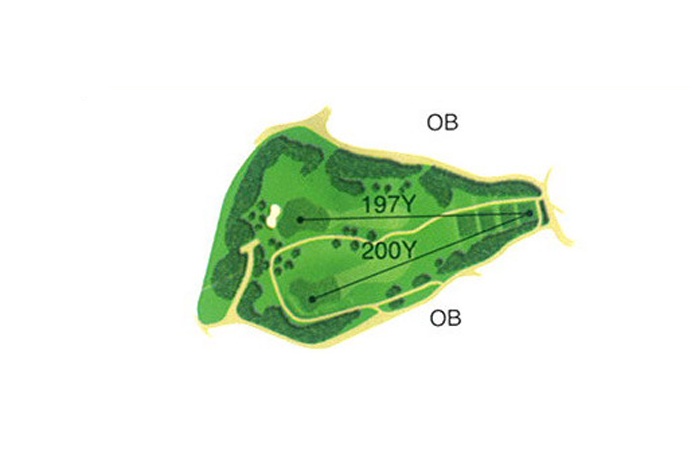
The par 3 (short hole) that closes out Chikushino. The left and right greens differ in height by a full 8 m, so it shows a completely different face depending on the green in use. In spring, the lovely pink of double cherry blossoms (yaezakura) shines amid the fresh greenery, and behind the green, purple redbud (花蘇芳, hanazuou) flowers bloom.
With an 8 m height difference, accurately checking the distance to the green in use today is half the battle. For the high green, take one or two more clubs; for the low green, less — trust the distance from your caddie or cart navigation and pick your club.
+ Practice hole · 華道 (Hana no Michi / "Flower Path") · PAR 5
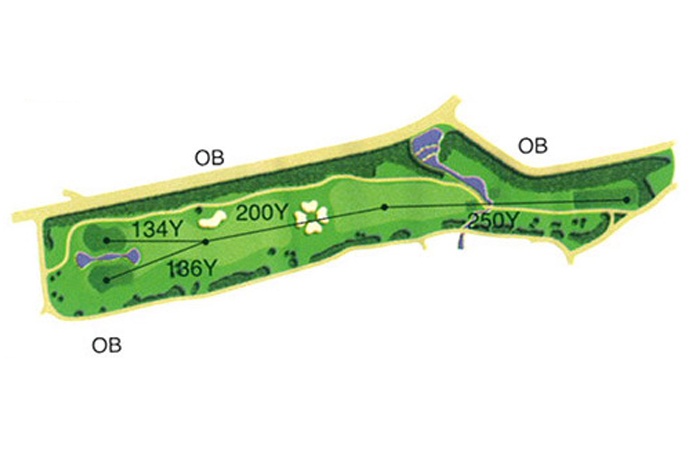
The extra (practice) hole at Chikushino, which is sometimes worked into the regular round depending on the day's conditions. A gentle uphill long hole (par 5), it draws the eye with the creek in front of the tee and a "flower"-shaped bunker shaped after a dogwood (hanamizuki) blossom right in the middle of the fairway. Between the two greens is a water bunker, where you can even take on a water-shot challenge with a dropped ball. A grand long hole surrounded by towering Japanese black pine (kuromatsu).
Whether this hole is in the day's round is decided by the club to suit the course condition. If you meet it, avoid the central "flower bunker," use the fairway wide, and on your third shot mind the water bunker between the two greens to dial in your distance.
Expressions you'll often use with caddies and playing partners.
Hole distances, par, and green operation may vary with the season and club circumstances (especially the two greens and the inclusion of the practice hole). The data and hole maps above are compiled based on the Chikushino Course guidance on the course's official website (fcgc.biz); the handicap (hole-difficulty ranking) is omitted as there's no official notation. We recommend confirming the latest information on the teeing-ground signboards and cart navigation on the day of your round.